2.5 硬碟空間的分配
您的第一個任務就是要決定分配給 FreeBSD 用的磁碟空間、label, 以便 sysinstall 幫你做相關準備動作。 因此,你必須先對 FreeBSD 是如何確認磁碟的流程有個概念。
2.5.1 BIOS 磁碟機編號
在您安裝、設定 FreeBSD 之前,有很重要的一點必須注意,尤其當您有許多顆硬碟的時候。
在 PC 架構,當您跑像 MS-DOS® 或 Microsoft® Windows® 這種跟 BIOS 設定相關的作業系統, BIOS 那邊可以調整正常的磁碟機順序,然後這些作業系統會跟著 BIOS 做改變。 這讓使用者不一定非得要由所謂的 “primary master” 硬碟開機。 有人發現最簡單、便宜的備份系統方式,就是再去買一顆一模一樣的硬碟, 然後定期使用 Ghost® 或 XCOPY 來把資料從第一顆硬碟複製到第二顆硬碟上面去。 所以,當第一顆硬碟掛了(可能是病毒或壞軌造成的),就可以輕鬆透過調整 BIOS 中的開機順序, 而直接用第二顆硬碟開機。這跟將機殼拆開,把第二顆硬碟跟第一顆對調(要調 jumper)有同樣的效果, 差別就是:不用拆機殼。
此外,若裝有比較貴的 SCSI 卡系統,通常本身也有 BIOS 的功能來讓 SCSI 設備(最多可到 7 個)達到類似改變順序的功能。
習慣上述方式的使用者很可能會感到驚訝,因為在 FreeBSD 中並非如此, FreeBSD 不會參考 BIOS 設定值,而且也不能偵測 “logical BIOS drive mapping” 設定。 這會讓人感覺很疑惑,明明就是一樣的硬碟, 而且資料也完全從另一顆複製過來,結果卻沒辦法像以前那樣用。
使用 FreeBSD 的時候,請將 BIOS 中的硬碟開機順序調回原本正常的順序, 並且以後不要再改這設定。如果您需要切換硬碟順序的話,那請用硬體方式, 直接打開機殼,調jumper 及排線即可。
2.5.2 以 FDisk 來建立分割磁區(Slices)
Note: 在這時候您所做的變更都還不會真正寫入硬碟中。 如果你發現弄錯了,想要重來一遍的話, 可以用選單來離開 sysinstall, 或是按 U 鍵來 Undo(回復) 所有設定。 如果你弄亂了而且不知道怎麼離開,你可以直接將電腦電源關掉再重來。
在 sysinstall 主畫面選擇使用標準安裝後, 應該會看到下面的訊息:
                                 Message
 In the next menu, you will need to set up a DOS-style ("fdisk")
 partitioning scheme for your hard disk. If you simply wish to devote
 all disk space to FreeBSD (overwriting anything else that might be on
 the disk(s) selected) then use the (A)ll command to select the default
 partitioning scheme followed by a (Q)uit. If you wish to allocate only
 free space to FreeBSD, move to a partition marked "unused" and use the
 (C)reate command.
                                [  OK  ]

                      [ Press enter or space ]
這時請依畫面說明,按 Enter 鍵。 然後會看到一個列表,上面會列出所有在偵測硬體時所找到的硬碟。 Figure 2-11 範例顯示的是有找到兩個 IDE 磁碟機的情形, 這兩個磁碟機分別為: ad0 與 ad2。

You might be wondering why ad1 is not listed here. Why has it been missed?
Consider what would happen if you had two IDE hard disks, one as the master on the first IDE controller, and one as the master on the second IDE controller. If FreeBSD numbered these as it found them, as ad0 and ad1 then everything would work.
But if you then added a third disk, as the slave device on the first IDE controller, it would now be ad1, and the previous ad1 would become ad2. Because device names (such as ad1s1a) are used to find filesystems, you may suddenly discover that some of your filesystems no longer appear correctly, and you would need to change your FreeBSD configuration.
To work around this, the kernel can be configured to name IDE disks based on where they are, and not the order in which they were found. With this scheme the master disk on the second IDE controller will always be ad2, even if there are no ad0 or ad1 devices.
This configuration is the default for the FreeBSD kernel, which is why this display shows ad0 and ad2. The machine on which this screenshot was taken had IDE disks on both master channels of the IDE controllers, and no disks on the slave channels.
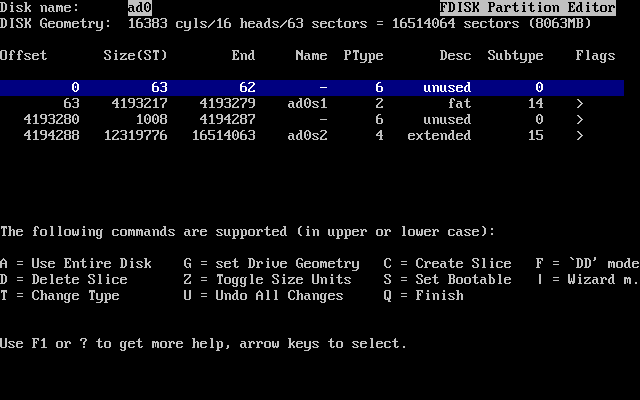
You should select the disk on which you want to install FreeBSD, and then press [ OK ]. FDisk will start, with a display similar to that shown in Figure 2-12.
The FDisk display is broken into three sections.
The first section, covering the first two lines of the display, shows details about the currently selected disk, including its FreeBSD name, the disk geometry, and the total size of the disk.
The second section shows the slices that are currently on the disk, where they start and end, how large they are, the name FreeBSD gives them, and their description and sub-type. This example shows two small unused slices, which are artifacts of disk layout schemes on the PC. It also shows one large FAT slice, which almost certainly appears as C: in MS-DOS / Windows, and an extended slice, which may contain other drive letters for MS-DOS / Windows.
The third section shows the commands that are available in FDisk.
What you do now will depend on how you want to slice up your disk.
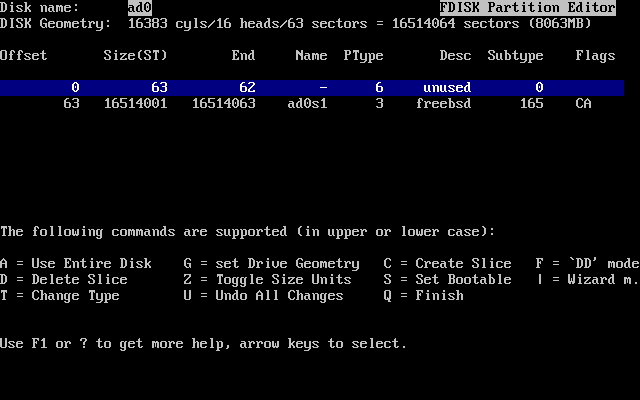
If you want to use FreeBSD for the entire disk (which will delete all the other data on this disk when you confirm that you want sysinstall to continue later in the installation process) then you can press A, which corresponds to the Use Entire Disk option. The existing slices will be removed, and replaced with a small area flagged as unused (again, an artifact of PC disk layout), and then one large slice for FreeBSD. If you do this, then you should select the newly created FreeBSD slice using the arrow keys, and press S to mark the slice as being bootable. The screen will then look very similar to Figure 2-13. Note the A in the Flags column, which indicates that this slice is active, and will be booted from.
If you will be deleting an existing slice to make space for FreeBSD then you should select the slice using the arrow keys, and then press D. You can then press C, and be prompted for size of slice you want to create. Enter the appropriate figure and press Enter. The default value in this box represents the largest possible slice you can make, which could be the largest contiguous block of unallocated space or the size of the entire hard disk.
If you have already made space for FreeBSD (perhaps by using a tool such as PartitionMagic®) then you can press C to create a new slice. Again, you will be prompted for the size of slice you would like to create.
When finished, press Q. Your changes will be saved in sysinstall, but will not yet be written to disk.
2.5.3 安裝 Boot Manager
You now have the option to install a boot manager. In general, you should choose to install the FreeBSD boot manager if:
-
You have more than one drive, and have installed FreeBSD onto a drive other than the first one.
-
You have installed FreeBSD alongside another operating system on the same disk, and you want to choose whether to start FreeBSD or the other operating system when you start the computer.
If FreeBSD is going to be the only operating system on this machine, installed on the first hard disk, then the Standard boot manager will suffice. Choose None if you are using a third-party boot manager capable of booting FreeBSD.
Make your choice and press Enter.
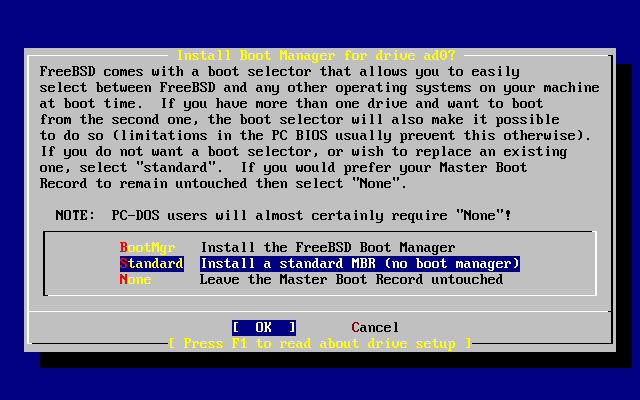
The help screen, reached by pressing F1, discusses the problems that can be encountered when trying to share the hard disk between operating systems.
2.5.4 在其他硬碟上建立分割磁區(Slices)
If there is more than one drive, it will return to the Select Drives screen after the boot manager selection. If you wish to install FreeBSD on to more than one disk, then you can select another disk here and repeat the slice process using FDisk.
Important: If you are installing FreeBSD on a drive other than your first, then the FreeBSD boot manager needs to be installed on both drives.

The Tab key toggles between the last drive selected, [ OK ], and [ Cancel ].
Press the Tab once to toggle to the [ OK ], then press Enter to continue with the installation.
2.5.5 以 Disklabel 來建立分割區(Partitions)
You must now create some partitions inside each slice that you have just created. Remember that each partition is lettered, from a through to h, and that partitions b, c, and d have conventional meanings that you should adhere to.
Certain applications can benefit from particular partition schemes, especially if you are laying out partitions across more than one disk. However, for this, your first FreeBSD installation, you do not need to give too much thought to how you partition the disk. It is more important that you install FreeBSD and start learning how to use it. You can always re-install FreeBSD to change your partition scheme when you are more familiar with the operating system.
This scheme features four partitions——one for swap space, and three for filesystems.
Table 2-2. 第一顆硬碟的分割區(Partition)配置
| Partition | Filesystem | Size | Description |
|---|---|---|---|
| a | / | 100 MB | This is the root filesystem. Every other filesystem will be mounted somewhere under this one. 100 MB is a reasonable size for this filesystem. You will not be storing too much data on it, as a regular FreeBSD install will put about 40 MB of data here. The remaining space is for temporary data, and also leaves expansion space if future versions of FreeBSD need more space in /. |
| b | N/A | 2-3 x RAM |
The system's swap space is kept on this partition. Choosing the right amount of swap space can be a bit of an art. A good rule of thumb is that your swap space should be two or three times as much as the available physical memory (RAM). You should also have at least 64 MB of swap, so if you have less than 32 MB of RAM in your computer then set the swap amount to 64 MB. If you have more than one disk then you can put swap space on each disk. FreeBSD will then use each disk for swap, which effectively speeds up the act of swapping. In this case, calculate the total amount of swap you need (e.g., 128 MB), and then divide this by the number of disks you have (e.g., two disks) to give the amount of swap you should put on each disk, in this example, 64 MB of swap per disk. |
| e | /var | 50 MB | The /var directory contains files that are constantly varying; log files, and other administrative files. Many of these files are read-from or written-to extensively during FreeBSD's day-to-day running. Putting these files on another filesystem allows FreeBSD to optimize the access of these files without affecting other files in other directories that do not have the same access pattern. |
| f | /usr | Rest of disk | All your other files will typically be stored in /usr and its subdirectories. |
If you will be installing FreeBSD on to more than one disk then you must also create partitions in the other slices that you configured. The easiest way to do this is to create two partitions on each disk, one for the swap space, and one for a filesystem.
Table 2-3. 其他硬碟的分割區(Partition)配置
| Partition | Filesystem | Size | Description |
|---|---|---|---|
| b | N/A | See description | As already discussed, you can split swap space across each disk. Even though the a partition is free, convention dictates that swap space stays on the b partition. |
| e | /diskn | Rest of disk | The rest of the disk is taken up with one big partition. This could easily be put on the a partition, instead of the e partition. However, convention says that the a partition on a slice is reserved for the filesystem that will be the root (/) filesystem. You do not have to follow this convention, but sysinstall does, so following it yourself makes the installation slightly cleaner. You can choose to mount this filesystem anywhere; this example suggests that you mount them as directories /diskn, where n is a number that changes for each disk. But you can use another scheme if you prefer. |
Having chosen your partition layout you can now create it using sysinstall. You will see this message:
                                 Message
 Now, you need to create BSD partitions inside of the fdisk
 partition(s) just created. If you have a reasonable amount of disk
 space (200MB or more) and don't have any special requirements, simply
 use the (A)uto command to allocate space automatically. If you have
 more specific needs or just don't care for the layout chosen by
 (A)uto, press F1 for more information on manual layout.

                                [  OK  ]
                          [ Press enter or space ]
Press Enter to start the FreeBSD partition editor, called Disklabel.
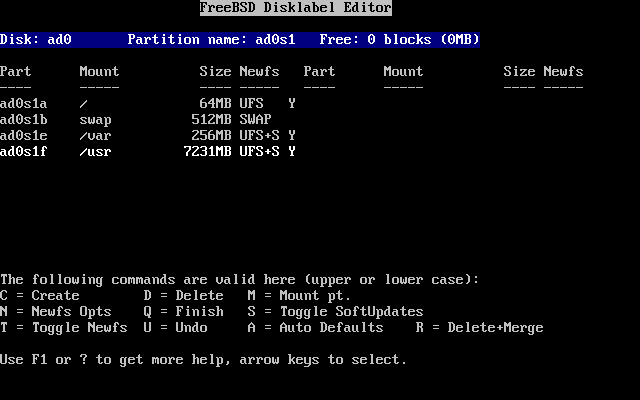
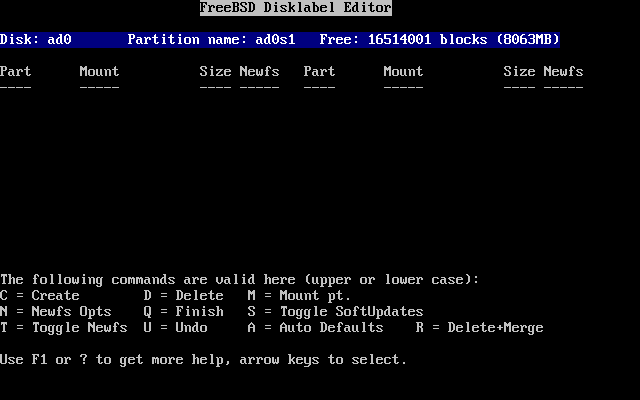
Figure 2-16 shows the display when you first start Disklabel. The display is divided in to three sections.
The first few lines show the name of the disk you are currently working on, and the slice that contains the partitions you are creating (at this point Disklabel calls this the Partition name rather than slice name). This display also shows the amount of free space within the slice; that is, space that was set aside in the slice, but that has not yet been assigned to a partition.
The middle of the display shows the partitions that have been created, the name of the filesystem that each partition contains, their size, and some options pertaining to the creation of the filesystem.
The bottom third of the screen shows the keystrokes that are valid in Disklabel.
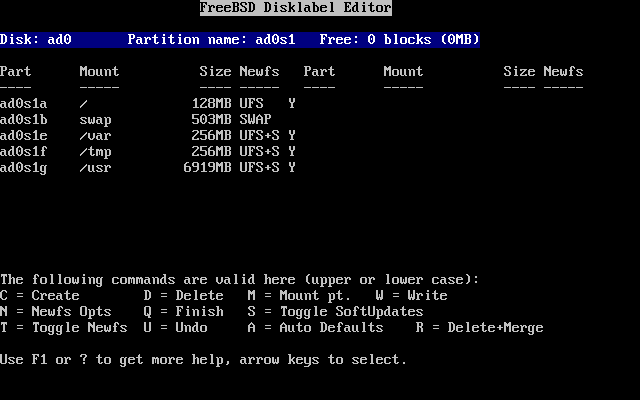
Disklabel can automatically create partitions for you and assign them default sizes. Try this now, by Pressing A. You will see a display similar to that shown in Figure 2-17. Depending on the size of the disk you are using, the defaults may or may not be appropriate. This does not matter, as you do not have to accept the defaults.
Note: Beginning with FreeBSD 4.5, the default partitioning assigns the /tmp directory its own partition instead of being part of the / partition. This helps avoid filling the / partition with temporary files.
If you choose to not use the default partitions and wish to replace them with your own, use the arrow keys to select the first partition, and press D to delete it. Repeat this to delete all the suggested partitions.
To create the first partition (a, mounted as / —— root), make sure the proper disk slice at the top of the screen is selected and press C. A dialog box will appear prompting you for the size of the new partition (as shown in Figure 2-18). You can enter the size as the number of disk blocks you want to use, or as a number followed by either M for megabytes, G for gigabytes, or C for cylinders.
Note: Beginning with FreeBSD 5.X, users can: select UFS2 (which is default on FreeBSD 5.1 and above) using the Custom Newfs (Z) option, create labels with Auto Defaults and modify them with the Custom Newfs option or add
-O 2during the regular creation period. Do not forget to add-Ufor SoftUpdates if you use the Custom Newfs option!
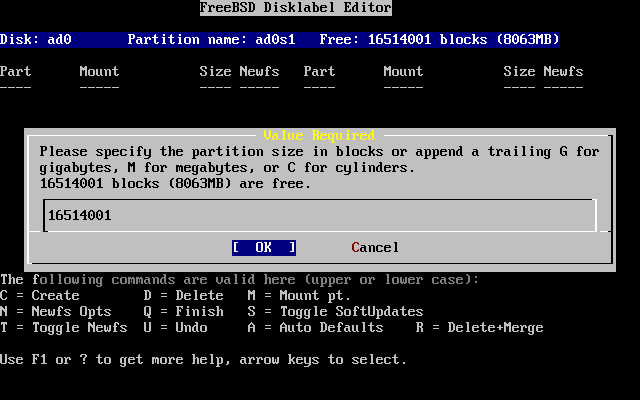
The default size shown will create a partition that takes up the rest of the slice. If you are using the partition sizes described in the earlier example, then delete the existing figure using Backspace, and then type in 64M, as shown in Figure 2-19. Then press [ OK ].

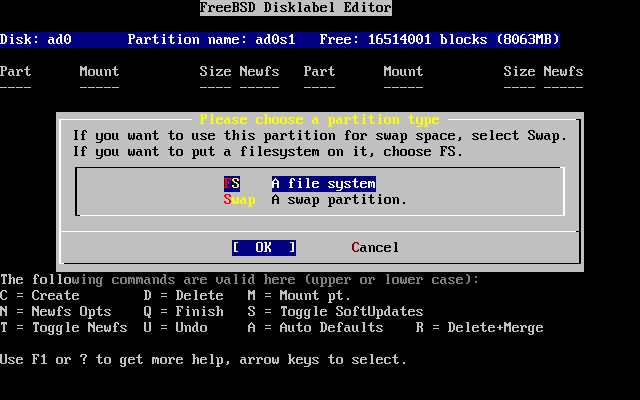
Having chosen the partition's size you will then be asked whether this partition will contain a filesystem or swap space. The dialog box is shown in Figure 2-20. This first partition will contain a filesystem, so check that FS is selected and press Enter.
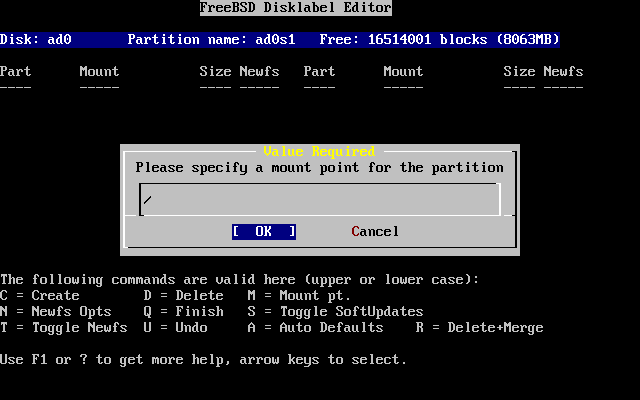
Finally, because you are creating a filesystem, you must tell Disklabel where the filesystem is to be mounted. The dialog box is shown in Figure 2-21. The root filesystem's mount point is /, so type /, and then press Enter.
The display will then update to show you the newly created partition. You should repeat this procedure for the other partitions. When you create the swap partition, you will not be prompted for the filesystem mount point, as swap partitions are never mounted. When you create the final partition, /usr, you can leave the suggested size as is, to use the rest of the slice.
Your final FreeBSD DiskLabel Editor screen will appear similar to Figure 2-22, although your values chosen may be different. Press Q to finish.